Thursday, 16 June 2011

Final photograph

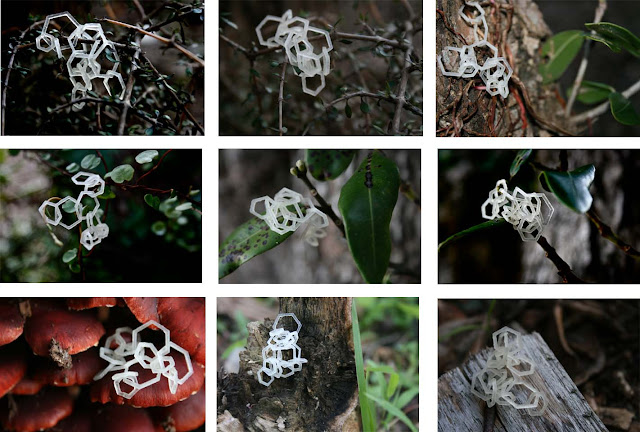
This is my final photograph of my model. I think that putting it into a natural environment was a good decision as it effectively conveys that I wanted my model to seem lifelike, organic and natural. I think that in this photograph, due to the area of focus, the hexagonal shape which I used to form my model is predominant, while still giving a good view of my whole form.

My model itself was quite a risk. Having the hexagonal shapes interlinking came with the risk of my model collapsing into a heap once printed in 3D. However, I think that this risk payed off and my model is really intresting and changable and can be made into endless different forms when played around with.

Final render.


This is my final render. I think that putting my models into a setting was quite a risk as it could detract from my models rather than add to them, however, I think that through the combination of textures, shading and this setting in particular, my models are easily visible and stand out from the backdrop. I think that having my final model on the concrete part of the background draws your eye to this model, which is what I was hoping to achieve. Having the models rendered in an environment also tells us a lot about my models, indicating that I wanted them to appear organic and natural. This wouldn't have been achieved through using a plain backdrop. The use of textures and bmp's also adds to the overall, lifelike scene.

Photographs

When it came to photographing my model I decided that putting my model into a natural environment would be the most appropriate considering my orgional definition of pattern:

'A natural or chance marking, configuration, or design.'
 
and my 6 precedent images which are all images from nature. I wanted to carry this theme throughout my project and think i have achieved this. I wanted my model to almost seem 'lifelike' like a plant or some form fungus. therefor, i took multiple photos of my model within an outside setting. Here are some of the images i took:


Test Renders

Using the textures i gathered and some backdrop images i started trailing different renders. Here are some of the images i came up with.


Backdrop images:


Textures

When it came to rendering my models and adding textures to them i thought that organic textures would suit my models and precedent images. I looked up some textures on google and also took some of my own photos.

Google images:


Images I took:


Wednesday, 15 June 2011

Final Model


This is my final model which will be printed in 3D. It's a series of hexagonal, honey comb shapes all interlinked. I used multiples sizes and linked them all together in different directions. I then used the 'twist' modifier to slightly morph the shapes. I think this is quite a risk as once printed all the rings will slide around eachother and the model could end up just collapsing and not really looking like a 3D form. However, the way i've linked them means that hopefully they will all sit onto of eachother making a really interesting, changeable 3D form.

Development

Here are some development images of my models in solidwords and 3dsMax


Thursday, 9 June 2011

Solid Works

Here are some development images of my models in Solidworks which i will then put into 3dsMax and edit using the modifiers.

Sketches

To come up with some quick ideas of possible models i did a few sketches.

Tuesday, 7 June 2011


After researching my definition of pattern and precedent images i decided that the beehive or honeycomb was the most interesting pattern. I have always found it very interesting that the pattern is so perfectly repeated yet is made by these small insects. I also found it interesting that the bees themselves have a striped pattern on their body. A webpage, http://www.bioteams.com/2007/05/21/bees_and_pattern.html, quotes that 'Pattern recognition skills in bees are so advanced they can recognize human faces better than we can' clearly showing that pattern is such an important part of these insects and how they operate.